I had this fabulous jacket laying around. What do you think? It was a gift back in...a long time ago
 |
| This was actually from wet Seal |
I always like to show a quick Before and After before I get to the tutorial
Step 1
I cut it up!
Seriously be as careful as you can, you want to save as much of the leather as you can. You never know what you can make with a little scrap.
 |
| Photos 1-4 , my deconstructing this old Wet Seal jacket that will so be a Ombre Chevron cuff Bracelet for your wardrobe |
find the best piece for you to work with. This all depends on your preference in cuff bracelet size
 |
| If you are a visual learner then you will see from this collage that I found a section of leather and trimmed it off |
I will walk you thorugh the photos above
1, I found a pocket
2. Opened it up and saw that the inside trim was perfect sizes and shape for my soon to be chevron cuff bracelet
3. tried the leather piece away very carefully.
4.The I had a nice piece of leather to work with, that was once the inside of a jacket.
Step3
This is how I got it into the shape needed and added a backing
 |
| visual learners have you way with my photos |
1. Cut the strip of leather as straight as you can, leave it a bit larger than you would like(leather shrinks with heat, we will be using heat, I am a LAZY crafter)
2. Cut some fabric that will be your lining(I used part of some linen pants I cut up years ago)
3. Now make a sandwich. Leather, Iron on fusing, top it of with your lining.
not shown in the photos next you will iron it all together according to the directions on you fusing(or stitch witchery).
4. then trim it all up, making it pretty!
Step 4
Now add the chevrons with tape (I suggest painters tap,I was out...donations are welcome)
 |
| Tip: Make a guide line down the center, this will help keep the tape centered. You can do this by making a slight indention |
1. Make a right angle with two pieces of tape
2.Line up all your right angle to make things easier
3.place them all down very carefully, stay as lined up and centered as you can(do not press them down to firm yet)
4. Now remove every other piece of tape, like in photo 4. Then pres the remaining tape down very well, paying extra attention to the edges. This way your paint will not leak under the tape and ruin your whole project leading you to cry.
Step 5
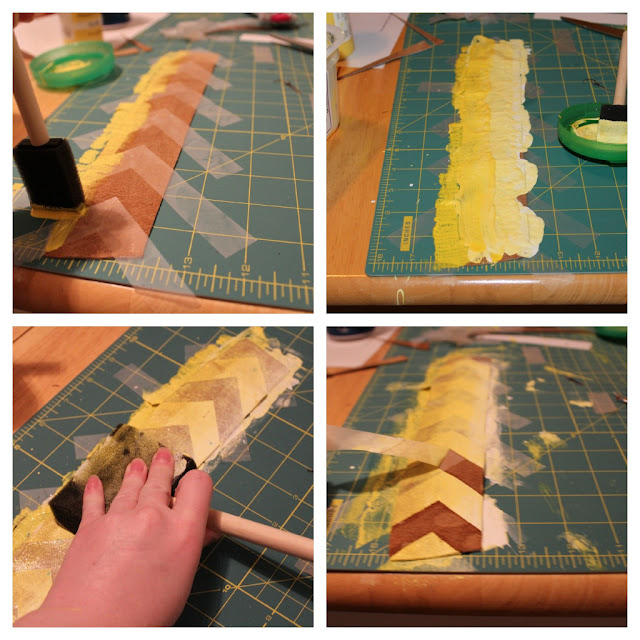
How to add the paint.
 |
| Tip: add the pain in an up and down tapping motion. This will help paint leaking under the tap, leading to crying.(photo1) |
This is the part in the process that you need to use your own creativity. I will describe how I added the paint.
1. Add a strip of the dark color, it is best to use a up and down tapping motion.
1.1 Next mix some white and paint a middle line of with the same up and down tapping motion.
1.2 Lats use the white and add very little of the darker color, make a third line. of the lightest color.
2. Photo two is how mine looked. You may choose to use more or less paint depending on how dark you want it to be. Less paint will make a less dramatic effect.
3. After letting the pain soak into the leather for a few moments. Then use a dry sponge to absorb the extra paint.
4. After letting that paint dry a touch more, VERY carefully remove the tape.
Step 6
Finish it up!
 |
| Let it dry over night |
1. this is how mine looked in the morning when I got up.
2. You have a lot of options on how to finish the bracelet, I have shown a few in photo 2
3. I chose to fold a leather strip under each side and then sew it down
4. TA-Da, that is how mine turned out! What do you think?
So what do you think of my bracelet? I hope you like it and will give it a try. Please leave a comment letting me know your thoughts. If you have any questions please email me and I will do my best to help you out.
This tutorial was featured over at

Linked up at
http://simplydesigning.blogspot.com/


Hi! New Follower from SITS.
ReplyDeleteI ADORE Chevron! Great Post :)
-Amy
http://bedesignsllc.blogspot.com/
Kasey- i love this cuff! I have one cuff that I wear all the time but because of that I am a little tired of it. Off to find me a groovy coat! Great score once again.
ReplyDeleteKim@reposhture.blogspot.com
Great design!
ReplyDeleteThis is stunning! featured it tonight! stop by and grab a button! :)
ReplyDeleteLovely idea! what will happen with the rest of the jacked? I am sure you could make many many other accessories! :)
ReplyDeleteCecilia
This was lovely thanks for sharing this
ReplyDelete