Sunday, June 15, 2014

How to Refashion Denim Shorts

I refashioned these shorts last fall, But short season is back! I loved doing his denim shorts refashion because it was easy and affordable. I love that 80's style splatter paint look right now! This is my twist on the dip dyed shorts mixed with splatter paint.
I hope you enjoy this easy DIY tutorial for a pair of white denim shorts with neon splatter paint on the hem. If you have any questions just ask. After all I spend my days and nights hoping someone is reading my tutorials.


This is an EASY Step by step Tutorial 
This is a step by step tutorial that will teach you how to refashion jean shorts into white and pink splatter painted shorts. I used girls size shorts but this tutorial will work for any size shorts. I used pink for my splatter painted hem but I think any color will look perfect. 

Before and After


 I think you could get away with out using the textile medium, but I love it. It is very affordable on Amazon.com. It makes your acrylic paint into fabric paint.(so that one purchase makes your whole paint stash turns into fabric paint!) All you have to do is mix some of the textile medium into your paint and your good to go. Using the textile medium will make the paint softer and more durable when you wash it. 
When you are finished your shorts should look something like this! If you do make a pair please let me  show them off! Send me a picture I will publish it for you. 

A while back someone donated a big bag of very used girls clothes to me. I always love a donation! For this project I pulled some jean shorts from that bag. They had good fabric and bad stains. I knew they would be the perfect pair to fix up and donate to someone's little girl.
(Please email me if you need a project donated to your little one)

Lets get started with this tutorial!

Steps 1-4(above)
1. Get Denim shorts
2. Add bleach and water to a sink 
3. Soak and watch until they reach the color you want
4. Wash and Dry 
 *Tip After you remove your shorts out of the bleach and water mix they will continue to become lighter and lighter until they are rinsed clean of all the bleach. Just like cupcakes keep on cooking until cool
Step 5
After your shorts are dry put cardboard between the legs, This will prevent any paint from seeping through. Also use tape and plastic to protect any part of the shorts that you do not want getting splatter painted.
Step 6
Mix your paint. 
  • Jar 1, mix the textile medium with the pink. (fallow the directions on the bottle)
  • Jar 2, mix the textile medium with the White
  • Jar 3, mix some of the pink and white(after the medium is added) together to make a lighter pink color.
*Tip I made a little diagram about mixing the paint for those of you who are more visual learners.


Step 7

Paint your shorts
  • 1st paint the dark pink along the hem on the front and back of the shorts. Leave it imperfect.
  • 2nd Splatter paint with the light pink over the first(dark) layer of paint.
  • 3ed Splatter with the white paint over the first 2 layers of paint. 
*Tip To get the splatter look use your paint brush to flick and drizzle paint.
After the splatters dry you remove the plastic. You can then add some other details if you want. I painted the coin pocket and the button detail in solid pink. Let it dry according to the textile medium directions. Then wash and dry.

Add some paint details

I love how this refashion worked out!  I hope you got some inspiration out of this post. If you did head over to https://www.facebook.com/LifeontheDivide and let me know what youthink
Thank you 
Here you have all of the steps in one picture !


Thursday, May 8, 2014

Easy Tutorial Arrow Necklace and blog hop #24


This Arrow Necklace is made out of painted suede, it is very fun and easy. This is the step by step tutorial. I made it with some old leather scraps and some nail polish. Just think of all the color options. Click here or the full step by step tutorial.


Now time for the Blog hop.

Tattler Thursday blog hop #24

Hiya Snappers! Welcome back to the 24th week of the Tattler Thursday Blog and Social Network Hop!

It's time to tattle and hop!

It's a share your crazy, gross, hilarious, in-the-trenches parenthood stories, or any tattle that you may want to share with us, that has nothing to do with kids, kind of blog hop! We love funny stories and we want to hear yours! You don't have to have kids to participate!

Just leave a comment with your story, post not required! So think of your funniest, wackiest or favorite stories, leave a comment  with your story/tattle, follow your Hostesses and Co-Hostesses, visit and discover other blogs, and have fun!

Remember the easiest way to get a follow back is to like/follow other pages and leave a comment! So hop around, tell your friends and share, share, share! This is a hop designed for you to have fun and share! Happy Tattling!
about the Blog Hop HERE!


This week's Featured Blogger is Joules from Pocketful of Joules.  Joules has been blogging since March 2011 on everything from losing a job, finding a new one, selling a house, buying a house, moving twice, getting pregnant and popping out a baby 2 months early. She’s a full time working mother, a blogger, a DIYer, a writer and a gourmet marshmallow eater.  Be sure to pay her a visit!


To be picked as next week's featured blogger of the week, and to be eligible for October's Tattler's Studio featured post on W3G, all about you and your blog, simply comment on one of the three Hostesses blogs with a funny, silly, gross, scary, wacky, or crazy kid story!

The Rules are:

1- Follow Your Host and Co-Hostesses

2- Grab the button and display it on your blog or hop page/section

3- Leave a comment with a funny, wacky, or gross kid story/tattle

*Be Sure to Hop over to other blogs and visit/network and share the Hop


*Have fun Hopping! (and come back next week!)

 
Your Hostesses
The Wild and Wonderful World of GingerssnapsComfytown Chronicles

The Co-Hostesses
THE DIRTY DIAPER   
 
 
I'm No Hum Drum Mum    Complete Bliss Blog
 
BabyForScale   


***If you have any questions or suggestions, you can reach us at tattlerthursday@gmail.com***

Thursday, October 17, 2013

How to make an easy vest out of any shirt and Bolg hop #23


I loved making this strange t shirt into this dip dyed vest. You can find the full step by step tutorial here 

Hiya Snappers! Welcome back to the 23rd week of the Tattler Thursday Blog and Social Network Hop!

It's time to tattle and hop!

It's a share your crazy, gross, hilarious, in-the-trenches parenthood stories, or any tattle that you may want to share with us, that has nothing to do with kids, kind of blog hop! We love funny stories and we want to hear yours! You don't have to have kids to participate!

Just leave a comment with your story, post not required! So think of your funniest, wackiest or favorite stories, leave a comment  with your story/tattle, follow your Hostesses and Co-Hostesses, visit and discover other blogs, and have fun!

Remember the easiest way to get a follow back is to like/follow other pages and leave a comment! So hop around, tell your friends and share, share, share! This is a hop designed for you to have fun and share! Happy Tattling!

about the Blog Hop HERE!


This week's featured blogger is Confessions of a (Not-so-) Super Mom!  She describes her blog as: "A not-so-prolific blog about whatever I feel like, regarding my not-so-super and totally self-deprecating parenting." You should go check out her blog and give her some lovin'!

To be picked as next week's featured blogger of the week, and to be eligible for October's Tattler's Studio featured post on W3G, all about you and your blog, simply comment on one of the three Hostesses blogs with a funny, silly, gross, scary, wacky, or crazy kid story!
The Rules are:
1- Follow Your Host and Co-Hostesses
2- Grab the button and display it on your blog or hop page/section
3- Leave a comment with a funny, wacky, or gross story/tattle

*Be Sure to Hop over to other blogs and visit/network and share the Hop

*Have fun Hopping! (and come back next week!)

 
Your Hostesses
The Wild and Wonderful World of GingerssnapsComfytown Chronicles

The Co-Hostesses
The Wine Chronicles   
 
    Complete Bliss Blog
 
BabyForScale   


***If you have any questions or suggestions, you can reach us at tattlerthursday@gmail.com***

Saturday, September 21, 2013

DIY Bold brass Necklace


This morning I received an email from
Chrisitna Perraki  the owner and editor of fauxbilicious.blogspot.com
. She mainly blogs about jewelry. Because she is blogging from Greece she had to  She translated her post into English for me. I am so glad she did because just LOVE it. I am glad to be able to feature her tutorial today. I hope you love it too. 

DIY:  Brass Necklace
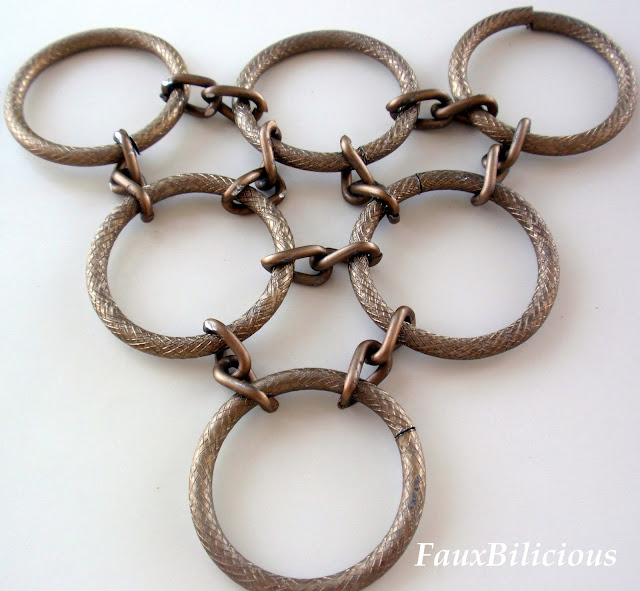
Recently I came across a last year's issue of Mirror magazine. It presented some of the most famous bloggers on the internet. Among them was Erica Domesek from P.S.I made this. A blog full of DIY projects. So I got inspired and made this:
You will need:5 great rings. The rings are of a diameter of 4 cm Two types of chains. Pliers. Clasp.
The process in pictures:


That's it!
The idea for this project came from here.
It's easy, quick and doesn't require many tools
Good Luck!

Friday, September 20, 2013

I would love to feature your DIY tutorial.

Do you have a craft Tutorial that you would love to have featured here on My Life On the Divide? Well guess what? I would love to feature you and your craft tutorial. Featuring other bloggers tutorials is going to be a new segment for my blog. I don’t have a lot of rules for submitting a tutorial.


How to submit a tutorial.
1.     Email me the link to your tutorial,not to your main blog, just the tutorial. At     lifeonthedivide(at)gmail(dot) com
2.      Under the link to the tutorial I need the HTML code. Cut and paste the tutorials HTML  code to the email under the link.

       If your tutorial is accepted for featuring I will email you back a short questionnaire to fill out. With the date that your tutorial will be featured. So you can promote it if you want.

A few things that might cause your submission to be denied:

1.The quality of the photographs. I will not feature poorly photographed submissions.
2. Huge watermarks or watermarks that cover the photos  I will give you more than enough credit for your work. I understand wanting to have a water mark on your work. But if you use a huge one or one that goes across the whole photo, please remove them before submission. 
2. If you received compensation for tutorial I might not be able to feature it.

How to get around these things?

1. Edit your photos if you feel that they are not going to be acceptable. Use picmonkey or other editing program to fix up your pictures. I attached two of my tutorials that show the type of images I use. Yours do not have to look like mine. This is just so you have an idea.( Please don't be too worried about this :)