Thursday, October 17, 2013

How to make an easy vest out of any shirt and Bolg hop #23


I loved making this strange t shirt into this dip dyed vest. You can find the full step by step tutorial here 

Hiya Snappers! Welcome back to the 23rd week of the Tattler Thursday Blog and Social Network Hop!

It's time to tattle and hop!

It's a share your crazy, gross, hilarious, in-the-trenches parenthood stories, or any tattle that you may want to share with us, that has nothing to do with kids, kind of blog hop! We love funny stories and we want to hear yours! You don't have to have kids to participate!

Just leave a comment with your story, post not required! So think of your funniest, wackiest or favorite stories, leave a comment  with your story/tattle, follow your Hostesses and Co-Hostesses, visit and discover other blogs, and have fun!

Remember the easiest way to get a follow back is to like/follow other pages and leave a comment! So hop around, tell your friends and share, share, share! This is a hop designed for you to have fun and share! Happy Tattling!

about the Blog Hop HERE!


This week's featured blogger is Confessions of a (Not-so-) Super Mom!  She describes her blog as: "A not-so-prolific blog about whatever I feel like, regarding my not-so-super and totally self-deprecating parenting." You should go check out her blog and give her some lovin'!

To be picked as next week's featured blogger of the week, and to be eligible for October's Tattler's Studio featured post on W3G, all about you and your blog, simply comment on one of the three Hostesses blogs with a funny, silly, gross, scary, wacky, or crazy kid story!
The Rules are:
1- Follow Your Host and Co-Hostesses
2- Grab the button and display it on your blog or hop page/section
3- Leave a comment with a funny, wacky, or gross story/tattle

*Be Sure to Hop over to other blogs and visit/network and share the Hop

*Have fun Hopping! (and come back next week!)

 
Your Hostesses
The Wild and Wonderful World of GingerssnapsComfytown Chronicles

The Co-Hostesses
The Wine Chronicles   
 
    Complete Bliss Blog
 
BabyForScale   


***If you have any questions or suggestions, you can reach us at tattlerthursday@gmail.com***

Saturday, September 21, 2013

DIY Bold brass Necklace


This morning I received an email from
Chrisitna Perraki  the owner and editor of fauxbilicious.blogspot.com
. She mainly blogs about jewelry. Because she is blogging from Greece she had to  She translated her post into English for me. I am so glad she did because just LOVE it. I am glad to be able to feature her tutorial today. I hope you love it too. 

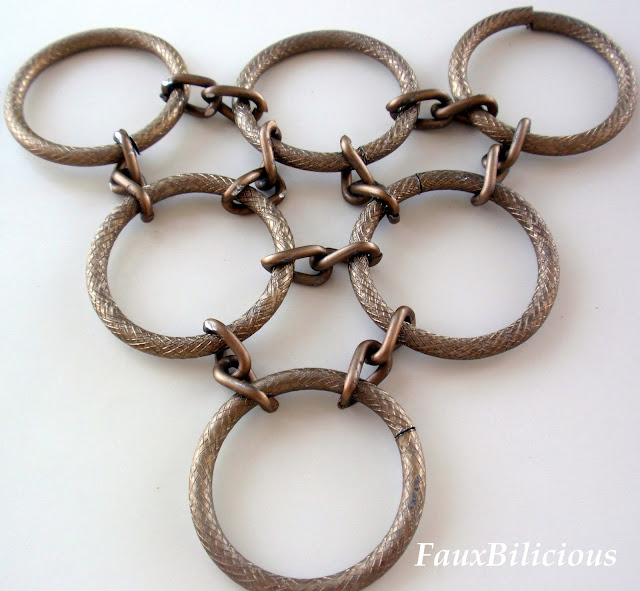
DIY:  Brass Necklace
Recently I came across a last year's issue of Mirror magazine. It presented some of the most famous bloggers on the internet. Among them was Erica Domesek from P.S.I made this. A blog full of DIY projects. So I got inspired and made this:
You will need:5 great rings. The rings are of a diameter of 4 cm Two types of chains. Pliers. Clasp.
The process in pictures:


That's it!
The idea for this project came from here.
It's easy, quick and doesn't require many tools
Good Luck!

Friday, September 20, 2013

I would love to feature your DIY tutorial.

Do you have a craft Tutorial that you would love to have featured here on My Life On the Divide? Well guess what? I would love to feature you and your craft tutorial. Featuring other bloggers tutorials is going to be a new segment for my blog. I don’t have a lot of rules for submitting a tutorial.


How to submit a tutorial.
1.     Email me the link to your tutorial,not to your main blog, just the tutorial. At     lifeonthedivide(at)gmail(dot) com
2.      Under the link to the tutorial I need the HTML code. Cut and paste the tutorials HTML  code to the email under the link.

       If your tutorial is accepted for featuring I will email you back a short questionnaire to fill out. With the date that your tutorial will be featured. So you can promote it if you want.

A few things that might cause your submission to be denied:

1.The quality of the photographs. I will not feature poorly photographed submissions.
2. Huge watermarks or watermarks that cover the photos  I will give you more than enough credit for your work. I understand wanting to have a water mark on your work. But if you use a huge one or one that goes across the whole photo, please remove them before submission. 
2. If you received compensation for tutorial I might not be able to feature it.

How to get around these things?

1. Edit your photos if you feel that they are not going to be acceptable. Use picmonkey or other editing program to fix up your pictures. I attached two of my tutorials that show the type of images I use. Yours do not have to look like mine. This is just so you have an idea.( Please don't be too worried about this :) 


Saturday, September 14, 2013

You Are Invited, Come Join The Refashion Community Board

Are you a refashionista? Then you are invited to come join my new refashion community board. All refashion, upcycle and clothing reconstruction-ers are welcome to come pin away. 


I started this community pin board a few weeks ago and already have some great members. Then I realized I never sent out a formal invitation! So here you go!


Now that you have been invited I am sure you want to know how to join so you can get to showing off all your refashions, right? Well its super easy to join the this Pintrest Community Pin Board. It only takes two steps.
STEP 1
Ask me for an invite, all are welcome.
STEP 2
Fallow me or the board(if not then I can't send the invite)
  • You can either fallow all my boards. Just click this link My Life On The Divide. And fallow. I will fallow all contributors back and love you forever

 OR


Receive Your Invite
You will receive your invite shortly after asking to be invited. It will show up in your Pintrest feed. All you have to do is push the accept button. Then you are free to pin pin pin away.

THE RULES 
The Rules are very simple. You can pin anything that you refashioned.  You can pin as meany refashions as you want. You can pin as often as you want. You can pin a refashion that was a clothing item but you refashioned it into a non clothing item.(like a dress into earrings) Pretty much anything goes.
  • No etsy stores 
I am so happy to have you!

Wednesday, September 11, 2013

Wordless Wednesday #1

My First Wordless Wednesday Post

I have never published A Wordless Wednesday post here on, My Life On The Divide. However I was compelled today Wednesday, September 11, 2013. Because as they say; a picture is worth a thousand words

Photo by Det. Greg Semendinger. He has a moving website called out of the ashes911 

Exhibit #P200336 from the United States v. Zacarias Moussaoui Criminal trial No. 01-455-A – A collage of photographs of almost 3,000 victims, nearly all of those who were killed during the terrorist attacks on September 11, 2001 (missing are 92 of the victims and all of the terrorists).


Friday, September 6, 2013

Fabric Painted Duck Shirt Tutorial

DUCK! Any time my toddler sees a duck he screams DUCK! This is a tutorial on how I refashioned an old t-shirt into a cute toddler shirt. With a duck painted on it, with fabric paint.
You would be surprised at how often you see ducks. They are on commercials in baby books and toys, ducks are all over. And he LOVES them. The other day I was changing, while my duck lover was having a tantrum. I put on an old T-shirt and it had a picture of a goose on it(he thought it was a duck). He immediately stopped crying and started happily yelling DUCK, DUCK, DUCK! While pointing at my shirt. That is when it hit me, a light bulb moment. I needed to make him a duck shirt. 

Ok so now we have this Duck shirt tutorial.


Step 1
You need a shirt
I started with this nasty shirt that I was given. It was stained but very soft and a good fit. So I soaked it in bleach and got it almost 100% white.
Look how special it was
Step 2
You need a pattern
1. I drew mine. If you are not comfortable drawing yours then you can easily find free clip       art online and you're all set.   As for the word, If you don't want to write it freehand then       you can print out the letters in any font. Then just tape them under the duck image.
2. Then I traced my duck with a black sharpie. Because you will need your drawing or clip      art to be dark enough that it will show through the shirt. So make sure your image is            dark.
3. Tape your image to a thin piece of cardboard(think cereal box)

Step 3
Place Image
Place the cardboard with the image taped to it between shirt layers.
slide cardboard under shirt
Step 4
Tape
tape the shirt down to the table. Use the tape to help hold the cardboard in place, Also use the tape to help create straight lines for the word line on the bottom.
See how you can see the DUCK through the shirt?

Step 5
Draw the lines
I used another thin piece of cardboard to help make my lines nice and straight. I just used a black sharpie.(So far it has lasted very well for 2 washes, I will keep you updated)


Step 6
Paint the DUCK
I used acrylic paint mixed with a textile medium.(like I always do when painting fabric). It works very well and it is very easy. Here is a tutorial with directions on how I mix my fabric paint I ordered my textile medium on Amazon  but you can find the textile medium at most craft stores.
*tip I used  my fun collection of sharpie pens(also from amazon) for the wing and beak and some other fine details. For the paint I used a sponge brush and applied it with an up and down tapping motion.  
Step 7
Words
Paint the words, You could probably do this part with sharpie as well.  *tip when I do this again I will leave more space between the letters. I think they look bunched up.

Done!
Ok I thought I was done but I decided to add some more detail....
So we have a step 8
Add detail
I added a black outline with my sharpie and some other highlights. Like the duck eyelashes and some beak details. I even mixed up a lighter yellow to highlight the wing(OCD MUCH?).... I think it looks good both ways. So just get as creative as you want
DONE! WRONG... again.

I covered the stains with some paint. I dipped a glue stick in the paint I had left from the letters and it made a perfect stamp. I stamped random dots on the stained sleeve.  This covered up the stains very well. And at last I was finished!
DUCK SHIRT! DONE


Tuesday, August 20, 2013

DIY Reversible Arrow Necklace

I often get asked "how do I paint suede?" While trying to write a halfway acceptable post on how to paint suede, I somehow came up with this tutorial. A reversible painted suede necklace. Oh and the answer is YES, you can paint suede, this tutorial will show you how...kinda and soon I will come up with a better tutorial on painting suede.
DIY arrow necklace 
 I love all the arrow and leather jewelry that is in style right now. I combined those two ideas in creating this this easy DIY necklace tutorial. 
DIY arrow Necklace

When I made this project painted suede bracelet I had a lot of leather left over.  So I want to make some projects using the smaller scraps. I hope this will inspire you to upcycle any leather you might have laying around. 
Reversible Arrow Necklace
OK, gather your materials 
Pictures of what I used to make my painted suede necklace


I was going to use the chain photographed but I switched to a sterling silver chain and jump rings
                                                                Step 1 
Make a Stencil
I just drew an arrow free hand on a thick piece of paper(thats why its all ghetto looking). Then I carefully cut it out with scissors. If you are not comfortable drawing an arrow then you can also use a normal stencil or print one out for free from the internet.


Step 2

Trace Your Stencil
Trace the arrow on the leather. Try and do this on the edge so you save as much leather as you can for another project.


Step 3

Cut Out Your Arrow
Cut the arrow out of the leather  I just used sewing scissors for the arrow. Then I used an X-Acto knife to cut out the thin details in the back.


Step 4 

Prime the leather
You don't have to prime the leather.Suede leather sucks up paint. If you prime it before you put your color on less of it will be sucked up and it will glide on better. I primed mine with plain white acrylic paint. 

*Tip Leather has 2 sides, one will is more smooth and one is more textured. The more you prime the less the texture will show.


Step 5 Paint One Side

Paint one side how ever you want With acrylic paint. I used a brush that left thick brush marks on the arrow. You could use a sponge brush for smooth look. Like the way I painted these suede shoes 
Step 6 Nail Polish Time
When the acrylic paint drys. Flip the arrow over and paint the second side with silver nail polish. Paint the more textured side of the leather so the leather will look more like metal. (the silver and texture together create this look)
Step 7 Silver Trim(optional)
After the silver nail polish side dries. Flip the arrow back over (purple side up) Then paint a silver trim all the way around. This adds dimension. *tip You could also add stripes or dots
 Step 8 
Poke holes for jump rings.

LAST
Attach your jump rings and chain. Then you are all done with this cute double sided necklace.