Thursday, May 31, 2012

Easy Chevron Cuff Bracelet, How To

 Easy Chevron Cuff Bracelet, how to make one quick! Step by step  tutorial


I had this fabulous jacket laying around. What do you think?  It was a gift back in...a long time ago
This was actually from wet Seal
 I did not want the leather to wind up in a landfill so I have dectied to refashion it!  I want to make as much as I can out of this jacket.  Today's refashion is how to make an easy chevron ombre cuff  bracelet.  I cut it up!

            I always like to show a quick Before and After before I get to the tutorial

Step 1
I cut it up!
Seriously be as careful as you can, you want to save as much of the leather as you can. You never know what you can make with a little scrap.
Photos 1-4 ,  my deconstructing this old Wet Seal jacket that will so be a Ombre Chevron cuff Bracelet for your wardrobe

Step 2
find the best piece for you to work with.  This all depends on your preference in cuff bracelet size
If you are a visual learner then you will see from this collage that I found a section of leather and trimmed it off 
If you prefer to read
I will walk you thorugh the photos above
1, I found a pocket
2. Opened it up and saw that the inside trim was perfect sizes and shape for my soon to be chevron cuff bracelet
3. tried the leather piece away very carefully.
4.The I had a nice piece of leather to work with, that was once the inside of a jacket.


Step3
This is how I got it into the shape needed and added a backing
visual learners have you way with my photos
Steps to adding the backing
1. Cut the strip of leather as straight as you can, leave it a bit larger than you would like(leather shrinks with heat, we will be using heat, I am a LAZY crafter)
2. Cut some fabric that will be your lining(I used part of some linen pants I cut up years ago)
3. Now make a sandwich.  Leather, Iron on fusing, top it of with your lining.
not shown in the photos next you will iron it all together according to the directions on you fusing(or stitch witchery).
4. then trim it all up, making it pretty!

Step 4
Now add the chevrons with tape (I suggest painters tap,I was out...donations are welcome)
Tip: Make a guide line down the center, this will help keep the tape centered.  You can do this by making a slight indention 

How to add the tape
1. Make a right angle with two pieces of tape
2.Line up all your right angle to make things easier
3.place them all down very carefully, stay as lined up and centered as you can(do not press them        down to firm yet)
4. Now remove every other piece of tape, like in photo 4.  Then pres the remaining tape down very well, paying extra attention to the edges.  This way your paint will not leak under the tape and ruin your whole project leading you to cry.

Step 5
How to add the paint.
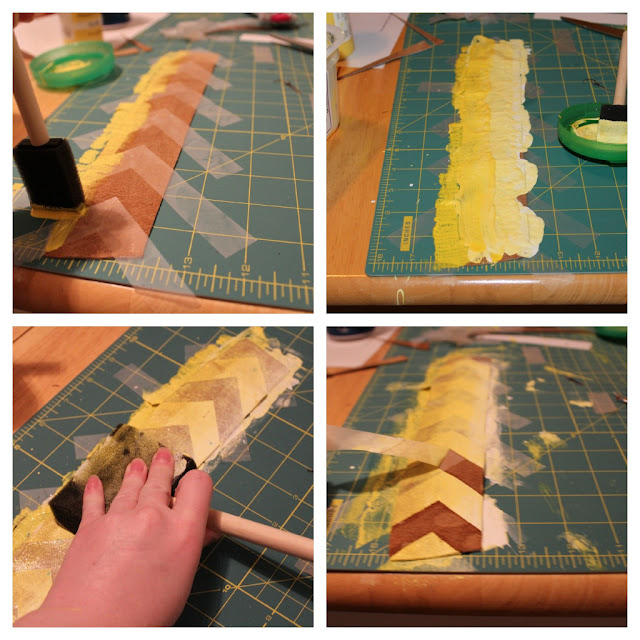
Tip: add the pain in an up and down tapping motion. This will help paint leaking under the tap, leading to crying.(photo1)
 Steps to add the paint
This is the part in the process that you need to use your own creativity.  I will describe how I added the paint.
1. Add a strip of the dark color, it is best to use a up and down tapping motion.
  1.1 Next mix some white and paint a middle line of with the same up and down tapping motion.
  1.2 Lats use the white and add very little of the darker color, make a third line. of the lightest color.
2. Photo two is how mine looked.  You may choose to use more or less paint depending on how dark you want it to be.  Less paint will make a less dramatic effect.
3. After letting the pain soak into the leather for a few moments.  Then use a dry sponge to absorb the extra paint.
4. After letting that paint dry a touch more, VERY carefully remove the tape.

Step 6
Finish it up!
Let it dry over night
This is how I finished mine up, I left mine kinda long so I could use it on my wrist or ankle!

1. this is how mine looked in the morning when I got up.
2. You have a lot of options on how to finish the bracelet, I have shown a few in photo 2
3. I chose to fold a leather strip under each side and then sew it down
4. TA-Da, that is how mine turned out! What do you think?

So what do you think of my bracelet? I hope you like it and will give it a try. Please leave a comment letting me know your thoughts.  If you have any questions please email me and I will do my best to help you out.

This tutorial was featured over at


Linked up at
                           http://simplydesigning.blogspot.com/


Tip Junkie handmade projects

Sunday, May 27, 2012

how to Refashion a Smocked Top into a Draped Back Top

Before and after, not that special.  Wanna see the back?
Ok the back is what makes the top special!  So what do you think!  I took a bunch of after photos:)

Sassy right?
Well then lets get right into it!  If you can't tell I have a thing for clothing items with smocking, I love to buy them to refashion.  They can work for tops, waist bands, headbands and even...yes even a bra in a pinch.

Step one

You need
1. Smock top with a hem
2. Ribbon
4. Safety Pin
3. Necklace(or other fun embellishment)


Step two
Mark with chalk the spots that you want the the ribbon to show. The best way to find the spots is to put the top on and mark it with chalk.
See my two chalk marks on the top I am upcycling into an open back top

Step three
Cut a slit at both the chalk marks.  Then slide your ribbon in one of the slits and pull it all the way around through the new "ribbon casing".  Then when you get back to the start tie it in a knot or stitch them together(after trying it on an making sure the measurement is right).  
Hide this knot in the casing AKA hem. You must try this on, and make sure it works before finishing it off.  Depending on you, your top and your body this might need to be done with elastic, and ribbon.(email me if you need help doing it that way) I only needed ribbon

This is how it should look with just the ribbon added.  You can leave it like this is you want.
Step4
Now add the necklace or another fun embellishments you like. Make sure the chain is longer than the ribbon.


TA-DA! This is how the back will look when you are finished!
The back of the refashioned smock top

So what do you think?  This is how it looks from the front! Very slimming for my postpartum belly!

And the back!

Tuesday, May 22, 2012

Fun in the sun

I am showing this picture of my belly because it is my blog and I can do what I want.  Well kinda.  I wrote up what I thought was a pretty good tutorial yesterday.  Yesterday was also this super cool eclipse.  So I added a bit of personal info in my tutorial.  


It went something like this.  The sun was so cool today  this is a few rad pictures I got.  Fun, now lets go to the tutorial.  Anywho* I wanted to shear that tutorial with another blog on this world wide web and guess what.  That is right! They couldn't care less about my fun in the sun crap and only wanted to see the fancy tutorial.  I guess that makes a lot o  since.


So being that I spent about 4 hours editing the sun pictures I didn't just delete them.  I posted them here.  So if you want to look at the cool solar eclipse, then this is the post for you. enjoy.


The sun made some cool crescent shapes the on the wall then I took some photos of how silly our reflections looked.


Total Solar Eclipse 5-20-12
So we had a little fun with that. It made taking the "refashion" photos a more exciting process than usual. Most of the time the photo sessions is more of an argument session between me and my photographer.
My friend Nicole said " It looked like a Cheshire cat grin in the sky" 
Okay then.


Bye


*
anywho

An extremely annoying misuse of the word "anyhow." Generally used by people who think they're being clever.
Anywho, how was your day?

Monday, May 21, 2012

How to Refashion a Maxi Dress in to a One Shoulder Top


I like the after much more

Today’s Maxi dress refashion is number 2 on my list. You can see my list of Maxi dresses that need to be refashion in this post. I cleverly named it Maxi Dress Fix you can check that out if you like.


This is how my dress looked before
So this dress has a little story behind it. I saw it a few years ago on the clearance rack at Wal-Mart for only 3$. It was way to big for me at the time, so I snatched it up with big plans for the fabric, I was going to make it something way cooler. However it slowly worked its way to the very far back of my very deep closet. 

Then last year when I was pregnant and nesting cleaning out my closet in the middle of the night.(I was looking for something that would fit, anything) Then lo and behold; the 3 dollar Maxi...and IT FIT! I was so excited, it was a perfect fit, not to mention very comfy. I wore it the whole 3rd trimester. 


Now the dress is bit stretched out in the bust and it is not flattering on me at all. You know what that means...Time to chop it up!


Enough of the chitchat! Lets get going!

I am going to show you how to make a maxi dress into a one shoulder top. It is very easy and fast, with very little sewing. So let's get started with Maxi dress #2. Step 1 Get your supply's together You will need a maxi dress that has a smocked top Scissors
and either Needle and thread or sewing machine Step 2
Chop the bottom of the dress off! In order to measure it right you need to first lay the dress out. Next use a top that you like the length to measure with. Lay the top on the dress. Line the bottom of the top up with the bottom of the smocked portion of your dress. (I found this very hard to describe, so look at the photo below for better directions)
Cut the bottom of the dress of(we will use that later)


Step 3
Try on the dress, upside down(with the smocking around your waist). Then pull up one side to make a shoulder and pin it. I made mine about 5 inches, but you can make your sleeve as long or short as you like. See the photo below, that is the small part you will have to sew.
The top of the dress will now be the waist of the one shoulder shirt.
Step 4 Sew that short straight line. My dress did not need a hem, depending on the fabric of your dress you may choose or need to hem the whole thing.
Well that is it, your all done!  I told you it was easy to make your old maxi into a new top!
So what do you think of my new top, do you love it?  I sure do!   
Can you believe that this cute little was an old maxi dress?
Here is a little Before and After shot so you can see how much it changed and because I am so happy with how this one worked out!


I hope you found this tutorial on how to upcyle a dress easy.  If you have any questions on it just message me, I am glad to help.
I would love to see how your maxi turns out, please send me a picture!  


Thank you so much for looking, let me know what you think.


I am linking up at The grant life

Friday, May 18, 2012

How to Refashion a Maxi Dress

The Easy way to Refashion a Maxi Dress

How to refashion a maxi dress so you can get more more out of it, is what we are talking about today. I am in the process of working on a whole "maxi" dress series. Because you can do so to give new life to these dresses. 
This is a no-sew maxi dress refashion

Yesterday I posted all about my Maxi Dress issues and my mission to refashion them.  If you want to see all of them you can look at yesterday's post called Maxi Dress Fix.  So today I refashioned number one on my list of dresses to fix, as promised.  I am going to show you how I did it, in case you also have a bunch of out dated Maxi dresses that also need a face lift.

Step 1
Get your supply's
Maxi Dress
Scissors
Some pins and chalk will help

Step 2
Fold the side seams together, then lay the skirt down.  Then pin the bottom together to keep it lined up well. Next make one long diagonal cut.  If you need to use chalk to help you can... as you see from the photos I changed my mind regarding my chalk line.
One diagonal cut from front to back
Step 3
I had a left over strap that I removed from my project last week.  I just laced the strap trough a hole that was in the top of the dress.  It was part of the design, you can see in the photo below.  Then I just tied it around my neck.  If your dress does not have a weird hole like mine did, you will have to attach the new straps with needle and thread.

See how I was able to add the neck strap without having to sew
Step 4
I used the remaining part of the skirt that I cut away as a head band.  I thought it might help cover the spots that I am now balding, I don't know if it helped.  I have this new theory I try and use ALL my scraps.  No scrap left behind!

So this is how it turned out! What do you think? I think I will get much more use out of it now.
My new dress
If the headband is not for you, or maybe your dress wont let you easily add a neck strap, cause I know how much the thread and needle can suck.  Then I came up with a second option for you.  In this option I did not add the neck strap and I used the cut away portion as a little shoulder shawl.  I like this option also.


Well what do you think?  I think it both ways of wearing the new dress both turned out great! I like it so much more now.  I think I will be able to wear it more now, because it looks less formal. I hope you enjoyed this refashion, please let me know what you think.  I hope you will give this maxi dress refashion a try on one of your outdated dresses.  Send me a picture of what you come up with.

Maxi Dress Fix

Count them 1,2,3 yes 3 black maxi dresses
Do you have a closet full of maxi dresses that have over stayed their welcome?  I do, and the time has come the time is now! it's time that I am going to do something about it. 


Look at all my black maxi dresses! I have to say that none look particularly  good on me at this stage in my postpartum body journey. So let’s get to work! I am going to do three separate refashions on these three dresses.


This is dress number 1
Dress number 1 I got this for a wedding when I was pregnant 


In the interest of keeping things simple I am going to start with number one.
Ok are you ready? Ok next post will be dress #1 I hope you like what I have planed.


Thursday, May 17, 2012

DIY Butterfly Stamp

How to make a stamp out of empty T.P. rolls

DIY butterfly stamps from upcycled tp rolls


This is how it will stamp


I have a project I am working on, that you will soon see, and I needed a stamp for it.  Well since the project is all about T.P. rolls, they were the first thing that came to mind.  That is how I came up with this cute little stamp.  

It is so easy to make, just fallow along with my quick tutorial on how to make your own butterfly stamp and you will have one in no time.  So you can stamp your house up like I did.  I hope you enjoy my tutorial .
I just needed to add a few more pictures of my butterfly stamp because I love it
Well I really do love how my little stamp works and how easy and free it is.  So I am going to show you how I made it.  It is VERY easy and perfect for a beginner.  If you make it now, then when you do next weeks project you will be all set. Ok then, let's get started!


Step 1
Get all the supplies together
1.An empty toilet paper or paper towel roll
2.Paint
3.Small paint brush(Q-tip could work)

Step2
Pinch and then fold the T.P. Roll.  Shown in the photo below.
That is it! You have made the stamp


 Step 3
 Dip your new stamp in your paint
Dip in the paint of your choice


Step 4
Stamp one direction then turn the stamp, and stamp the other direction.  This will create the effect of a "pair" of wings.
See where I'm going with this?
Step 5
Now is the fun part. Use the paint brush to add a body and any other embellishment you would like.
Just paint a line down the middle for the body
I added some little dots, with my left hand
If I could do it with my left hand while taking photos with my right, then you can make them look amazing
So that is it! That is how you make a fast and easy butterfly stamp out of an empty toilet paper or paper towel roll. You could use fabric paint and spruce up an old shirt or just add a little butterfly to you kids lunch bag.

Well what do you think?  I hope you will give it a try.  Let me know if you do, I would love to see how your butterfly stamps made out of T.P. rolls turns out.


I love to party! So I am linking up at a few fun party's, check them out.


Pomp party at create.craft.love
Weekend Wrap Up Party at tatertots and jello