Showing posts with label upcycle. Show all posts

Thursday, May 31, 2012

Easy Chevron Cuff Bracelet, How To

 Easy Chevron Cuff Bracelet, how to make one quick! Step by step  tutorial


I had this fabulous jacket laying around. What do you think?  It was a gift back in...a long time ago
This was actually from wet Seal
 I did not want the leather to wind up in a landfill so I have dectied to refashion it!  I want to make as much as I can out of this jacket.  Today's refashion is how to make an easy chevron ombre cuff  bracelet.  I cut it up!

            I always like to show a quick Before and After before I get to the tutorial

Step 1
I cut it up!
Seriously be as careful as you can, you want to save as much of the leather as you can. You never know what you can make with a little scrap.
Photos 1-4 ,  my deconstructing this old Wet Seal jacket that will so be a Ombre Chevron cuff Bracelet for your wardrobe

Step 2
find the best piece for you to work with.  This all depends on your preference in cuff bracelet size
If you are a visual learner then you will see from this collage that I found a section of leather and trimmed it off 
If you prefer to read
I will walk you thorugh the photos above
1, I found a pocket
2. Opened it up and saw that the inside trim was perfect sizes and shape for my soon to be chevron cuff bracelet
3. tried the leather piece away very carefully.
4.The I had a nice piece of leather to work with, that was once the inside of a jacket.


Step3
This is how I got it into the shape needed and added a backing
visual learners have you way with my photos
Steps to adding the backing
1. Cut the strip of leather as straight as you can, leave it a bit larger than you would like(leather shrinks with heat, we will be using heat, I am a LAZY crafter)
2. Cut some fabric that will be your lining(I used part of some linen pants I cut up years ago)
3. Now make a sandwich.  Leather, Iron on fusing, top it of with your lining.
not shown in the photos next you will iron it all together according to the directions on you fusing(or stitch witchery).
4. then trim it all up, making it pretty!

Step 4
Now add the chevrons with tape (I suggest painters tap,I was out...donations are welcome)
Tip: Make a guide line down the center, this will help keep the tape centered.  You can do this by making a slight indention 

How to add the tape
1. Make a right angle with two pieces of tape
2.Line up all your right angle to make things easier
3.place them all down very carefully, stay as lined up and centered as you can(do not press them        down to firm yet)
4. Now remove every other piece of tape, like in photo 4.  Then pres the remaining tape down very well, paying extra attention to the edges.  This way your paint will not leak under the tape and ruin your whole project leading you to cry.

Step 5
How to add the paint.
Tip: add the pain in an up and down tapping motion. This will help paint leaking under the tap, leading to crying.(photo1)
 Steps to add the paint
This is the part in the process that you need to use your own creativity.  I will describe how I added the paint.
1. Add a strip of the dark color, it is best to use a up and down tapping motion.
  1.1 Next mix some white and paint a middle line of with the same up and down tapping motion.
  1.2 Lats use the white and add very little of the darker color, make a third line. of the lightest color.
2. Photo two is how mine looked.  You may choose to use more or less paint depending on how dark you want it to be.  Less paint will make a less dramatic effect.
3. After letting the pain soak into the leather for a few moments.  Then use a dry sponge to absorb the extra paint.
4. After letting that paint dry a touch more, VERY carefully remove the tape.

Step 6
Finish it up!
Let it dry over night
This is how I finished mine up, I left mine kinda long so I could use it on my wrist or ankle!

1. this is how mine looked in the morning when I got up.
2. You have a lot of options on how to finish the bracelet, I have shown a few in photo 2
3. I chose to fold a leather strip under each side and then sew it down
4. TA-Da, that is how mine turned out! What do you think?

So what do you think of my bracelet? I hope you like it and will give it a try. Please leave a comment letting me know your thoughts.  If you have any questions please email me and I will do my best to help you out.

This tutorial was featured over at


Linked up at
                           http://simplydesigning.blogspot.com/


Tip Junkie handmade projects

Monday, May 21, 2012

How to Refashion a Maxi Dress in to a One Shoulder Top


I like the after much more

Today’s Maxi dress refashion is number 2 on my list. You can see my list of Maxi dresses that need to be refashion in this post. I cleverly named it Maxi Dress Fix you can check that out if you like.


This is how my dress looked before
So this dress has a little story behind it. I saw it a few years ago on the clearance rack at Wal-Mart for only 3$. It was way to big for me at the time, so I snatched it up with big plans for the fabric, I was going to make it something way cooler. However it slowly worked its way to the very far back of my very deep closet. 

Then last year when I was pregnant and nesting cleaning out my closet in the middle of the night.(I was looking for something that would fit, anything) Then lo and behold; the 3 dollar Maxi...and IT FIT! I was so excited, it was a perfect fit, not to mention very comfy. I wore it the whole 3rd trimester. 


Now the dress is bit stretched out in the bust and it is not flattering on me at all. You know what that means...Time to chop it up!


Enough of the chitchat! Lets get going!

I am going to show you how to make a maxi dress into a one shoulder top. It is very easy and fast, with very little sewing. So let's get started with Maxi dress #2. Step 1 Get your supply's together You will need a maxi dress that has a smocked top Scissors
and either Needle and thread or sewing machine Step 2
Chop the bottom of the dress off! In order to measure it right you need to first lay the dress out. Next use a top that you like the length to measure with. Lay the top on the dress. Line the bottom of the top up with the bottom of the smocked portion of your dress. (I found this very hard to describe, so look at the photo below for better directions)
Cut the bottom of the dress of(we will use that later)


Step 3
Try on the dress, upside down(with the smocking around your waist). Then pull up one side to make a shoulder and pin it. I made mine about 5 inches, but you can make your sleeve as long or short as you like. See the photo below, that is the small part you will have to sew.
The top of the dress will now be the waist of the one shoulder shirt.
Step 4 Sew that short straight line. My dress did not need a hem, depending on the fabric of your dress you may choose or need to hem the whole thing.
Well that is it, your all done!  I told you it was easy to make your old maxi into a new top!
So what do you think of my new top, do you love it?  I sure do!   
Can you believe that this cute little was an old maxi dress?
Here is a little Before and After shot so you can see how much it changed and because I am so happy with how this one worked out!


I hope you found this tutorial on how to upcyle a dress easy.  If you have any questions on it just message me, I am glad to help.
I would love to see how your maxi turns out, please send me a picture!  


Thank you so much for looking, let me know what you think.


I am linking up at The grant life

Thursday, May 17, 2012

DIY Butterfly Stamp

How to make a stamp out of empty T.P. rolls

DIY butterfly stamps from upcycled tp rolls


This is how it will stamp


I have a project I am working on, that you will soon see, and I needed a stamp for it.  Well since the project is all about T.P. rolls, they were the first thing that came to mind.  That is how I came up with this cute little stamp.  

It is so easy to make, just fallow along with my quick tutorial on how to make your own butterfly stamp and you will have one in no time.  So you can stamp your house up like I did.  I hope you enjoy my tutorial .
I just needed to add a few more pictures of my butterfly stamp because I love it
Well I really do love how my little stamp works and how easy and free it is.  So I am going to show you how I made it.  It is VERY easy and perfect for a beginner.  If you make it now, then when you do next weeks project you will be all set. Ok then, let's get started!


Step 1
Get all the supplies together
1.An empty toilet paper or paper towel roll
2.Paint
3.Small paint brush(Q-tip could work)

Step2
Pinch and then fold the T.P. Roll.  Shown in the photo below.
That is it! You have made the stamp


 Step 3
 Dip your new stamp in your paint
Dip in the paint of your choice


Step 4
Stamp one direction then turn the stamp, and stamp the other direction.  This will create the effect of a "pair" of wings.
See where I'm going with this?
Step 5
Now is the fun part. Use the paint brush to add a body and any other embellishment you would like.
Just paint a line down the middle for the body
I added some little dots, with my left hand
If I could do it with my left hand while taking photos with my right, then you can make them look amazing
So that is it! That is how you make a fast and easy butterfly stamp out of an empty toilet paper or paper towel roll. You could use fabric paint and spruce up an old shirt or just add a little butterfly to you kids lunch bag.

Well what do you think?  I hope you will give it a try.  Let me know if you do, I would love to see how your butterfly stamps made out of T.P. rolls turns out.


I love to party! So I am linking up at a few fun party's, check them out.


Pomp party at create.craft.love
Weekend Wrap Up Party at tatertots and jello

Wednesday, May 2, 2012

Refashion a shirt into vest

  How to make a easy no-sew vest out of any shirt

My New dip dyed vest refashioned from a shirt
This is my fancy before and after photo!  I made it with picMonkey.  I love PicMonkey so far!(A funny side note, Anonymous left me a comment saying this was a badly placed add.  I had to laugh because this is not an add, just my opinion.  PicMonkey has no idea that my little blog even exists.  I just love them and like to spread the word, Maybe I should publish the comment? what do you all think?)

Before and after shirt to vest refashion


This is the shirt I started with, it was a thrift store special.  I liked because of the dip dye effect.  I used my vest "formula" on this shirt to make it a fun ombre vest.  So fallow along and you can make one too! 
 I have a method I always use to refashion shirts into vests.  It will always work.  It can make any shirt into the perfect drapey vest. (Well so far it has always worked).

 I came up with this vest "method" by dissecting a favorite vest of mine.  Then using it as a template.  I used the template a few times and on a few different style shirts and realized it always works.  I like how it works the most on V-neck shirts.

So now I want to share my t-shirt to vest method with you. So you can make yourself a simple no-sew drapey vest.

I am sure I am not the inventor of this method.  It is so simple that I am sure a lot of people use it.  The original vest I used to make the pattern was a brand named Poetry. So lets get started!


Step one
Remove sleeves, bottom hem and cut down the middle.  
This shirt has some ugly studs on it, so I also removed them.  I was not sure how I was going to handle this because I don't usually have to remove more than the selves and bottom hem.
When removing the weird fake studs I was surprised with black fabric.

I was surprised when I removed the ugly studs that the fabric under them was good looking.  In this close up picture  you can see how it looked when I removed the studs.
I liked the raw edge that was left after removing the studs.


Step 2
I like to make my vests a racer back, I feel it is more flattering.  So I use a racer back  that fits well as a guide.(my old vest)  Lay the guide top over the one you want to cut, then trace with chalk.

 I cut only one side away with my rotary cutter. Then I use the cut out scrap portion as a stencil for the other side.(this helps make sure the two sides are the same.  After cutting away both arm holes you should have a racer back.

See how I cut from the top seam to the bottom making a "c" shape

Step 3
After the arms holes are cut into a racer back.  Then fold the vest long ways.  Use the seams from the old shirt to line everything up.

My dog selfishly got hair all over

Then chalk the bottom with a nice curve to show off the bum bum.(this is my favorite part of making the vest.  You can  go as dramatic as you want with this cut, making the back as short as you want.   I used my favorite vest to help guide me.  Then cut along the chalk line with your rotary cutter.

I love the look this cut gives.  It makes the back of the vest shorter and the front longer and drapey


TA-DA there you have it! A very easy and fast no-sew vest.  I love how this one turned out.  I hope you like it and I hope you will give this a try.

DIY dip dye vest


 I really loved the raw edges that were left after I removed the studs, so I just left it.


Raw edges left after removing the studds


In this picture you can see well how the back looks after I made the half circle cut.


Well I hope you liked my second refashion in my 30 day challenge.

I hope you will try to make one of these because they are so easy and fun and always turn out well.  If you do please send me a picture and let me know how it turned out!

I am liking up at hope studios

Update*
This post turned out to be my ver first feature! I was featured over at the Refashion files, an awesome new blog.  I am so excited Yay me!


Refashon a dress into a top


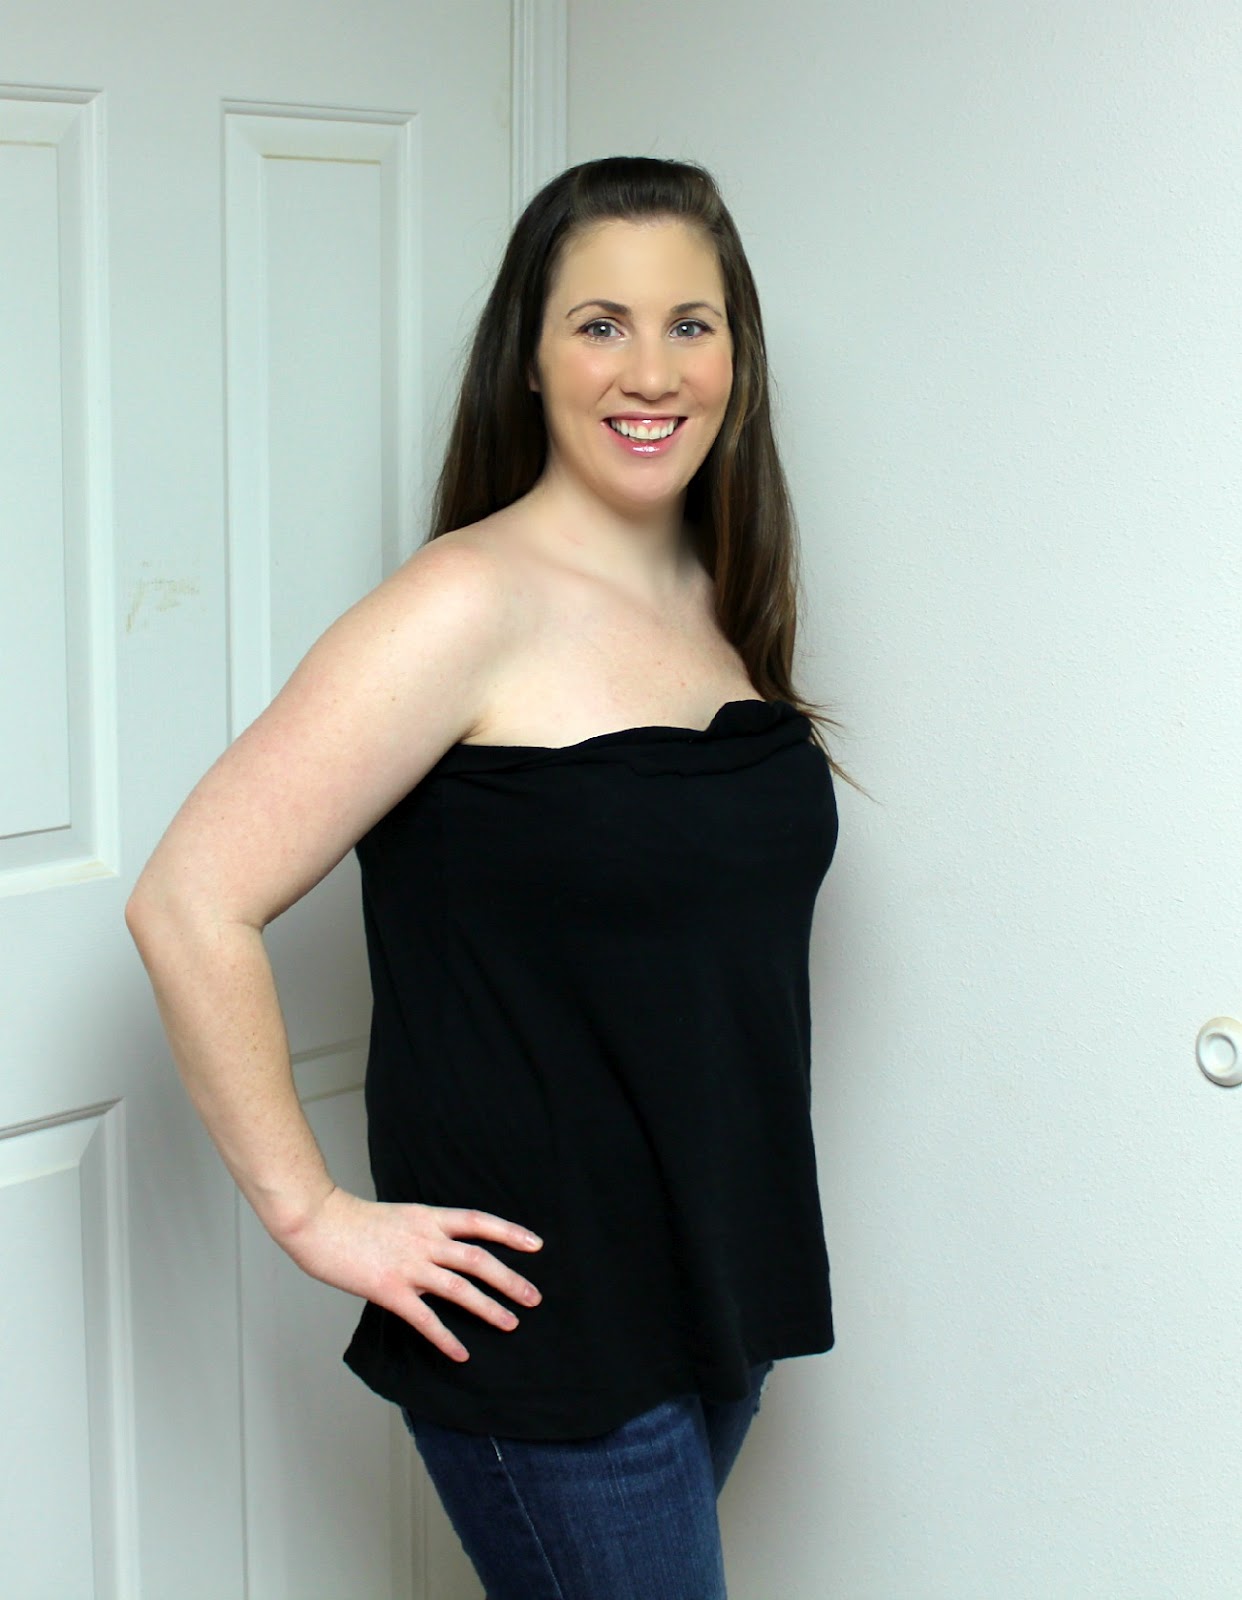
Refashion a summer dress into a strapless top 

Day One

I picked this little summer dress to refashion

Short Roxy dress


Yes I use to wear this little thing, now I can't get it over my bust if I could it wouldn't cover my bumbum. So I won't entertain you with a photo of my trying to put it on.

What do you think of the cute plastic heart on the back?  I know I too thought it was... special.

First thing first, I chopped that off!

I'm having a flash back from the 80's


Next I cut the top part away from the elastic, leaving about an inch seam allowance.  But when I cut the top part away I fount that the original top was double layered.   So I left the two raw edges sticking up and I stretched them apart.  This makes the fabric curl in a way that I love. It gave the top a bit of a ruffle, with out having to spend the time to make a ruffle! I like it.  It is pretty slimming in my post baby belly area and I can nurse the baby in this top! What do you think?  This was so fast and easy.  I hope you like it and give it a try.

Dress refashioned into top

Monday, April 30, 2012

Why easy refashions, don't get refashioned


 Why easy refashions, don't get refashioned

This is why clothing that should be easy to upcycle never gets finished.

This is one of my piles of clothing I want to refashion.


I have a huge pile of clothing I want to refashion that is ever growing.  Do you? I bet you do.  I bet you didn't think I would use an actual photo!  Today as I was trying to wrap my head around why I chose to attempt 30 refashions in 30 days.  I was looking at the HUGE pile trying to figure out why the pile just grows instead of producing awesome clothing for me.

Well I know exactly why my pile only grows.  It’s because I want my refashions to be perfections(is that a word)?  And I don’t have time to produce perfection.  Looking around at other peoples amazing blogs dose not help either.  Seriously you crafters are freaking geniuses.  I am not like you all, I only pretend I can refashion.

So this is what happens, how I accumulate a pile of clothing.  A great example is the brown dress I got for $2.  It could easily be refashioned.into a skirt,  I could just chop the top off and call it a day.  But I can see so much more potential than that...And this is where the problems start.

Let’s say it is a good day for refashioning so I get out that brown dress.  Now I don’t love brown, so instead of chopping the top and having a lovely refashion. I think how much better it would look if it were black.  After all I do have black dye.

Yes! That is what I will do, I will dye my dress!  As the excitement builds, the chance of this project being completed are ever slowing.  I start to think... “if I am going to get the black dye out I might as well find that other shirt I wanted to dye. This is usually the time things start to go bad and I get overwhelmed looking through the “pile” and give up.  

 But let’s just say its not a give up day, because they have happened. 

So after hours of digging out all my projects that need to be dyed black I am excited and can totally envision how this skirt should have little pink flower added too it.  Only I am out of pink thread!

 Now before you say that I should just go get some thread, living on the Divide means a 3 hr round trip for thread.  So running to get thread is not going to happen.  So I put the brown dress back in the pile along with all the other stuff to dye black.  Making it a day that I have only thought about refashion.  When I could have just chopped the top off and had a cute brown skirt.  But since I wanted a perfect skirt with pink thread on black…. It doesn’t happen.  It ended up, a give up day.

So for my 30 refashion in 30 days challenge.  I am not going to do this to myself.  I am just going to do it.  I am just going to be happy with my 5 min chopped top skirt.  Then if I can updated it to the perfect black with pink thread skirt when I have time I will.

Ok, I showed you my pile, I dare you to show me yours!

Saturday, April 28, 2012

May challenge 30 refashions for 30 days.


I challenge myself, 30  refashions in 30  days

I am challenging myself!

Why?  Here is the story that led me to this challenge, if you care.  If you just want the rules, skip to the bottom.

I am going through a uncomfortable time in my life.  I recently had a baby, my first.  I gained a lot of weight with that pregnancy.  I did not want to buy any clothes in my, after baby size.  It seamed like a waist of money, after all I had planned on being back in my size 2’s right away.  I figured breast feeding was going to help while also making my tops way too small.  So the plan was No new clothes until I could fit into my old ones.

I started feeling very sick not long after the baby was born.  I started losing a lot of hair (I thought this was normal).  Then I started feeling dizzy and sick.  I went to my Dr. thinking I was already pregnant again.  NO, not pregnant.  They told me I was fine. 

At this point I have bald spots (my Dr said that is normal after pregnancy, I don’t believe him) and I weigh more than I did at 40 weeks.  I feel very sick and I am always in pain along with all sorts of other things.  I found a Dr who gave me some blood tests; I should be getting the results soon.  I am worried about them but hope they prove something is wrong with me and that going bald after pregnancy is not normal.

Still, a problem I have is I need clothing that fits.  My maternity clothing, while it fits is out of season.  That is a big problem where I live. (It was snowing and is now in the 100’s)  No matter what this health issue is I am still sticking to the plan of no new clothes until I can fit into my old ones.

So let the refashioning begin!


Rules

My rules for my 30 refashions in 30 days challenge

  1. I can refashion clothing I have
  2. I can buy anything at any thrift store for refashioning  
  3. I can buy new clothing if it is reduced %75 or more for refashioning
  4. I challenge myself for 30 refashions for 30 days
  5. I get to take of 3 days for my birthday.  
  6. *added since it's my first mothers day, I can do something special that day.(not sure yet)


Do you want to join my challenge? 

Wednesday, April 4, 2012

How to refashion your skirt in to a High-Low hem skirt


Make a Hi-Low Skirt out of a circle skirt

(With pockets!)


A circle skirt before and after, refashioned into a hi-low skirt
Before and After


I have this skits, nothing much is wrong with it but not much is right with it.  The main thing I love about it is that it fits!(I still have lots of baby extra baby weight)
Boring skirt I need to refashion.
  I wanted to make it into one of the new hi-low skirts.  I have never had one. so I was not sure how much I would like it.  I wanted the option to "de-refashion" it back to its original shape; (this term de-refashion was recently coined by over at cotton and curls used by )  When I red her article I thought I was the only one who did that!  

OK! Lets get started!  

Step 1
Acquire a skirt(circle skirt is what I used) to refashion.  Then lay it out flat as pictured below.


Step 2
Pinch a place in the middle, I just eyeballed it, you might want to measure. (you can also do this while wearing it or on a dress form)


Step3
Pull that pinched pice up toward teh waist band.


Step 4
PIN IT!


Step 5
Now you need to pin the rest of the front of the skirt up to the waist band. You will want to pull up a portion that works best for you.(Pin up till about your hips) 


ALL pinned up.... coming along quite well!(better than I expected). My skirt had a liner that showed I just hacked it off. Refashioning means just going with it ya know.


How to refashion a long skirt into a short in the front and long in the back skirt

Step 6
Sew the top! Remove the pins!
You have options here.  If you want the option to be able to remove the stitches later(like I did) then go with a simple stitch.  If you want this to be a premanet refashion  then you can get more fancy wiht top stitching and all that.

TA-DAAAAAAAAAA

Skirt refashioned shorter in the front, with pockets
                    This is actually another photo,  it just looks very similar,hum.  Remind me to talk to my photographer/ boyfriend about mixing things up.
DIY refashion skirt from circle skirt to Hi-low skirt


Look kids, it has pockets! Freaking POCKETS! What more can you ask for? An easy fast refashion with pockets, ahhh I am so happy.  I will be wearing this out tomorrow!


Well friends I hope this tutorial was easy for you to follow. I certainly hope you will try this one, because it is awesome!  I hope you will give it a try, adding your own special touch.  Please send me a photo of you upcycled skirts, it seriously makes my whole day. I typed this at 4:35 AM, so let me apologize for anything that may be confusing. If anything is unclear,  please send me a message and hopefully I can clearafie it for you.